Fun with Mist labels

I have too many WLANs. I mean, don’t we all? Due to…”legacy”…I have a “Corp” WLAN, a guest WLAN, and then 3 others. Well, the other day I wanted to do something simple: I had a group of APs, 6 in total, that I wanted to NOT broadcast those other WLANs. It wasn’t super intuitive to me how to do this in Mist so I did what I usually do: I bugged Wes and here’s what I learned.

The correct way to do what I wanted to do was with a Label. Now here is where you have your first decision point: Do you need a label at the Site level or the Organization level? In my case at work I was applying this label to an Org level template, and so I needed to have an Org level Label. In the examples below I’m doing this with a Site level WLAN, so I need a Site level Label. The good news is that how you create the label is identical, it’s just a matter of where you do it.

So step 1: go to Site and click Labels:

Now you’ll see all the labels you have. In my home network I’ve named a bunch of clients, so those all show up here.

(Yes, I named my Roomba Dolores. As in Dolores Abernathy from Westworld.)

Anyway, next you click “Add Label” up in the corner. You might miss it, so I put a red box around it. Next you’re going to want to make your label. It looks like this:

So we need a Label Name, obviously. And this label is of type Access Point. But what’s really important is that you click the radio button next to NOT. Because this label represents the APs we want to EXCLUDE from a WLAN. After you select the NOT radio button then in the box under Label Values click the plus sign and you should see a list of your APs. (I have 4 APs at home.) In this example I picked two of them.

So after that click “Create”. It’ll take you back to your list of labels and you should see your new label now:

So now navigate to the config for the WLAN you want to exclude from your labeled APs.

Go over (or down) to “Apply to Access Points” and click “AP Labels”. Click on the plus sign and select your newly created Label:

And now once you’ve done that and the label is applied the “Save” button should turn blue so click that.

And that’s all there is to it. Now that I’ve done it once it seems simple, but at first I couldn’t quite figure out how it all sorted out. Thanks to Wes I did and so hopefully this will help someone else so that we all don’t bug Wes.

“So I put the directional antenna IN the AP.”

I will say, Cisco did not play this year at Mobility Field Day 9. That may be because the marketing team hired a ringer but I’m not gonna say anything more about that. What I do know is that they brought two of my favorite TMEs, Jim Florwick and Fred Niehaus. (They’re not big twitter dudes, so don’t get your hopes up.) These gentlemen are the best example of Wi-Fi and RF being as much art as science. I kinda want to be them (or Peter Mackenzie, who’s in the video you just clicked on) when I grow up.

This time Jim talked about AI RRM, but Fred…Fred talked about a lot of things. The thing I want to talk about that HE talked about is the 9166D1. I think the idea is brilliant and will be a great resource for a lot of 6GHz networks for a while…until external antennas get sorted (if they ever do). I think it solves for a pretty common issue and I found myself wondering “Why hasn’t anyone done this before?”

I have a fair number of external antennas in my environment. For the moment I’m going to ignore the ones in the floor and talk about the “usual” type. The open-air type. In one of the buildings we have these open spaces that originally needed coverage and then needed capacity. (Once the building was being lived in some of the spaces changed their use cases. It happens.) Now we were covering this space from the edges using 60° sector antennas. And when I moved to capacity…well I think I’m one of the few customers who used the DART connector on the 3802e with a second external antenna in dual-5GHz mode. But I’m special that way. Jim even said so…but he wasn’t really happy when he said it, you know?

And that’s the most common use case I see for sector antennas in your average deployment. But let’s be real – they be ugly AF usually. (Like…Cisco, why do you put bright orange labels on the coax?) It’s a pain for the installers to hook up. If you’re not ordering the antenna directly from the AP manufacturer then you have to match up connectors, number of leads, etc. Yes, it’s part of the job but it’s not a fun part of the job.

Well, combine the inherent nastiness of that kind of install with the current prohibition on external antennas in 6GHz and you get:

Look at that. In the words of Outkast: So fresh and so clean!

Here’s all the fun bits:

That’s a flagship alright. It does all the things and throws in a directional form factor to boot. Aside from the under-floor application I mentioned earlier I could use this instead of an external antenna in almost any indoor application that *I* have. (I say almost because I also have a pair of Gilaroos which is another Fred special.)

I know that Cisco is working hard to address some of the issues in their platform but I will say this: I never took issue with their RF design skills. I mean LOOK at that antenna design:

They even address my biggest complaint about the 9120/9130 form factor:

I dunno about you, but the first time I tried to plug a Cat 6A patch cable into a 9120 or a 9130 it was…snug. It looks like that feedback was acted upon. (This may also be the case with the regular CW9166, to be fair.)

All in all this looks like a very potent weapon to have in a wireless design arsenal. I look forward to playing with one.

Cloud NAC?

I’m just gonna say it: I’m getting old. I turn 50 this year. I arrived in the Valley in 1997. I’ve been doing networking for 25 years which shocks me to say. And I think I’ve done a pretty good job of keeping myself technically relevant. I study, I got my CWNE a few years ago…I mean I’m getting old but I’m not a fuddy duddy but…sometimes I wonder if I’m just ranting at kids to get off my lawn.

Last week at Mobility Field Day 9 we had not one but two vendors present “Cloud NAC”, or basically “RADIUS in the cloud”. Clearly this seems to be a “thing” now that we have to think about. And I have to wonder: Why? What’s the driver here? My gut tells me this is not a good idea. Is it just because of the aforementioned being old thing?

When it comes to RADIUS servers there are two big “products” – Cisco ISE and Aruba ClearPass. (Yes, there are others, such as Forescout’s platform and even FreeRADIUS, but that’s not the point.) I’ve played with both of them. I currently use ISE. (As I like to say – it’s not the worst piece of Cisco software I’ve used…but that list includes CMX and MSE so that’s a low bar.) And the more I work with it, the more I realize…ISE is its whole own thing. It’s a complex beast. I like to think I’m not stupid but I absolutely need adult supervision when playing with it. (Hi Jared!) ISE is not easy, nor is ClearPass, and I do think that part of the appeal of these cloud NAC platforms is that they try to take something that has traditionally been viewed as very complex and simplify it.

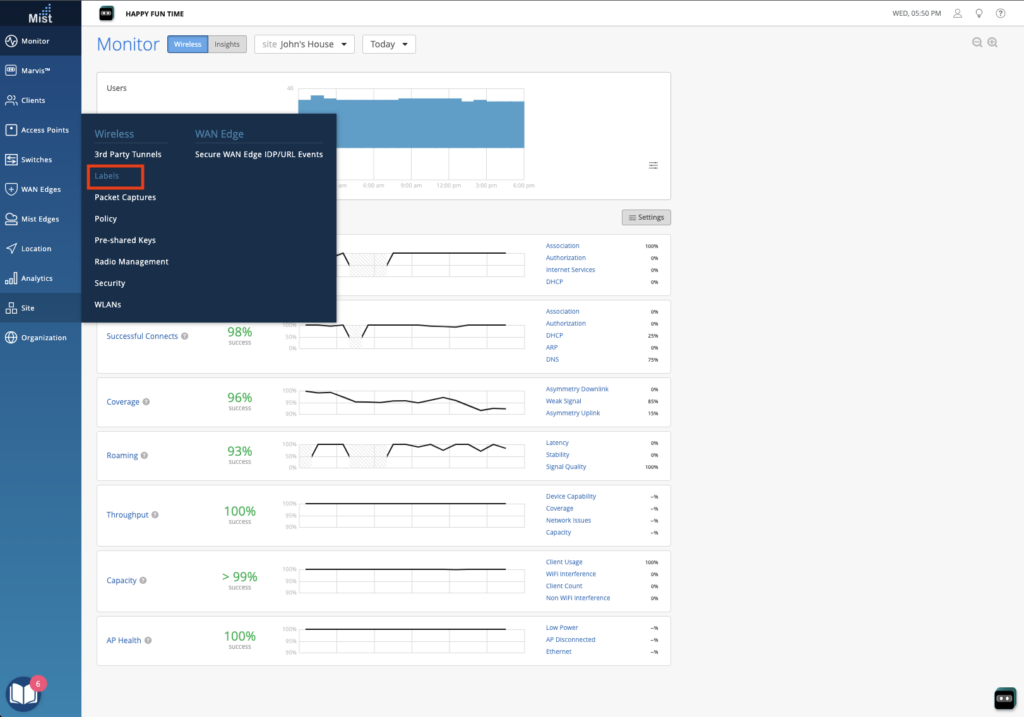
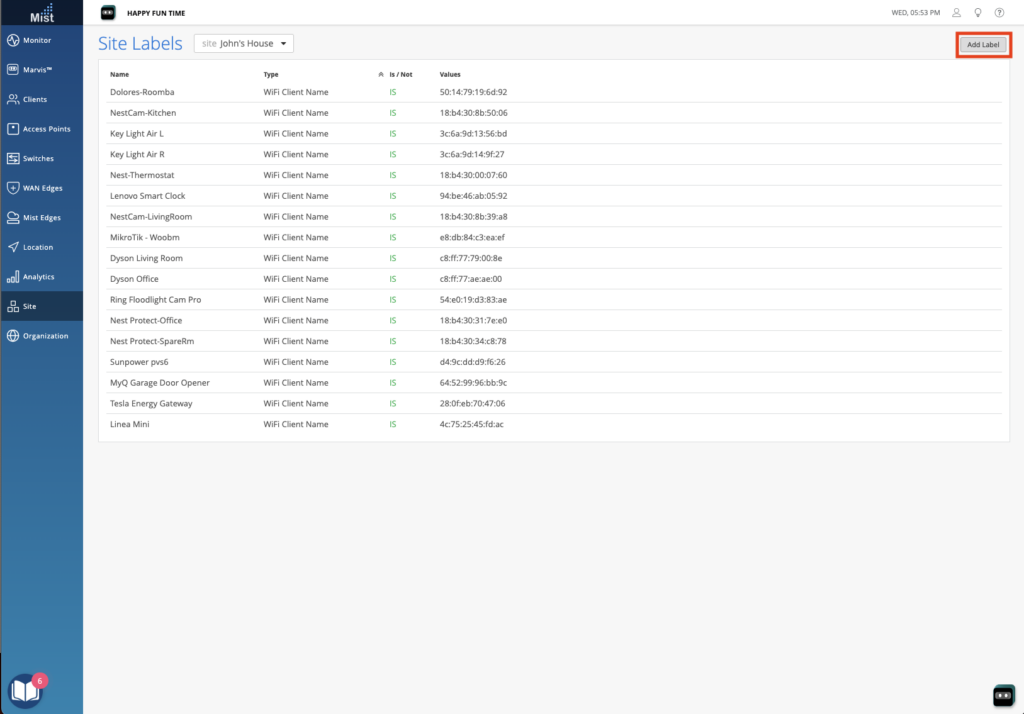
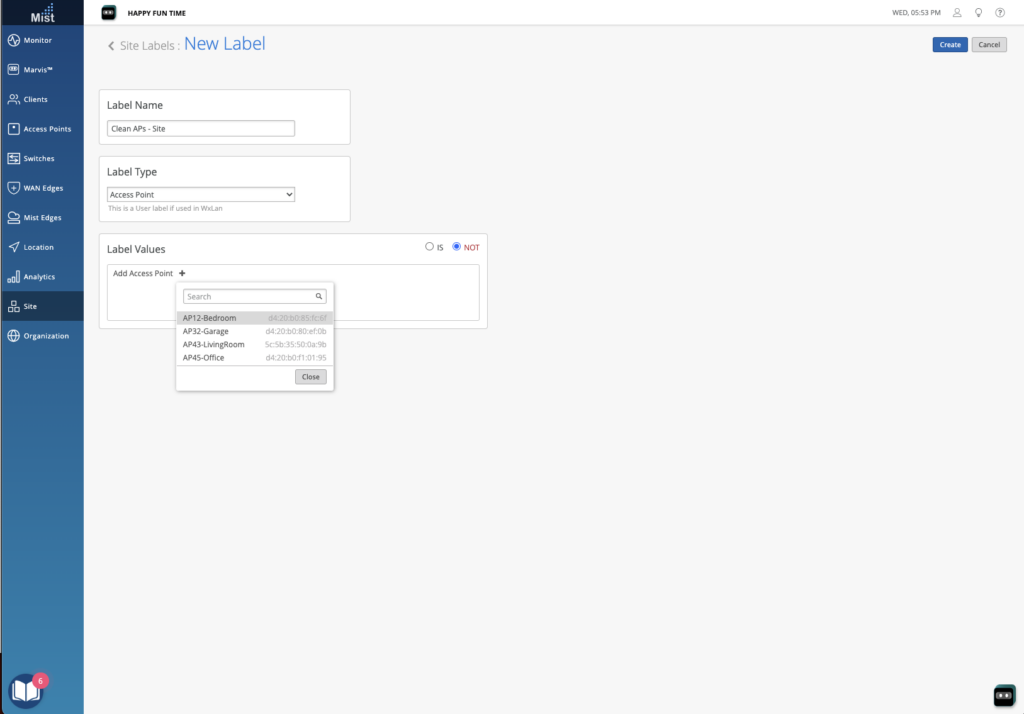
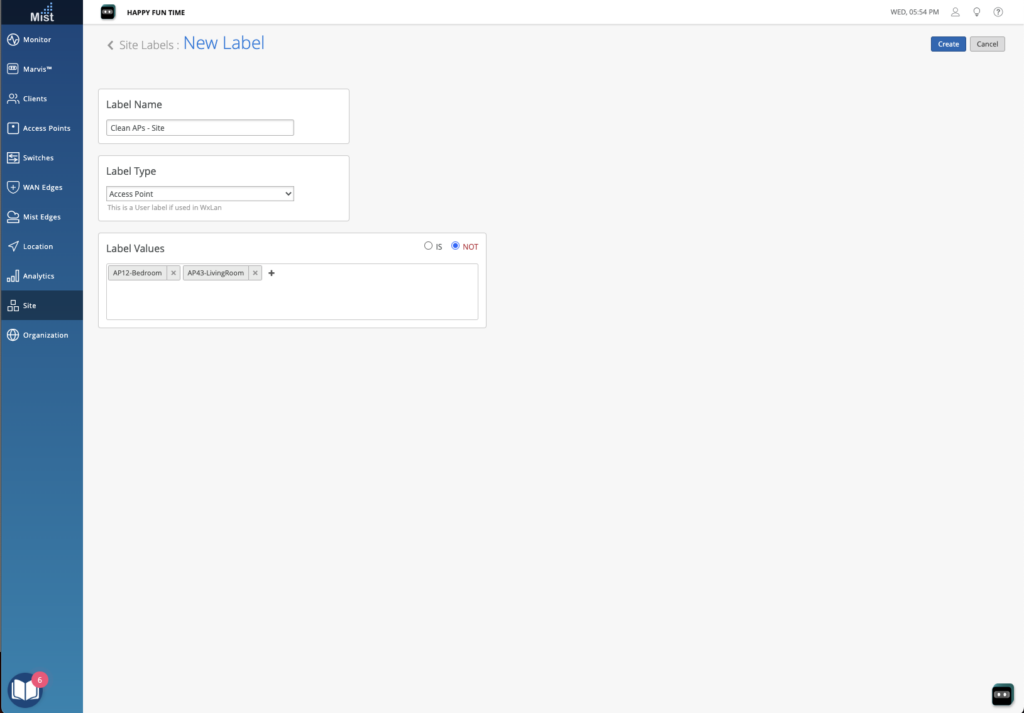
The first platform we were shown was Juniper’s Mist Access Assurance. This is clearly the result of their acquisition of WiteSand. My first impression from the limited demo that we saw was that the UI will be quite familiar to anyone who has worked with Juniper’s policy engine recently, such as with their SSR config. It felt very similar. It seems to be mostly focused on folks currently doing EAP-TLS client authentication – the marketing page says “Access Assurance provides identity fingerprinting based on X.509 certificate attributes.”. However one area where features need to be added are on endpoint profiling. The ability to talk to platforms like Intune and Jamf are required if posture enforcement (things like OS patch level, antivirus status, etc) are part of your network access policy.

Arista then showed up with CloudVision AGNI. I’m going to continue to insist that AGNI is a backronym. They claim is stands for Arista Guardian for Network Identity, but no sane PM would pick that name. (It’s still clever so I’m gonna let it slide.) In terms of functionality and UI it did seem a bit more traditional than the Juniper solution. I’m not going to call that necessarily a bonus – doing things the old way isn’t always the best way. It just seemed more familiar to an old man like me. Of interest was they had an “app store” like approach in terms of external integrations. Intune and Jamf were both demonstrated as “apps”.

Both platforms rely on RadSec for communication between Authenticators and Authentication Servers. They both also have a way to support devices that don’t do RadSec natively – for Juniper you can use a Mist Edge as a proxy and for Arista you can use one of their switches. (I’m not sure what percentage of potential Mist Access Assurance customers have Mist Edges as part of their deployment, but I’m sure that the vast majority of potential Arista AGNI customers have their switches.) This may be a minor concern – most of the devices out there can do RadSec. But you may run across some old 2924 or who knows what that needs this feature. (Kids, ask your parents.)

Neither platform seems to support TACACS. Like it or not, some of us still use TACACS for management plane authentication on large parts of our infrastructure. If I was asked to move completely off of ISE to one of these platforms that would be a problem to solve for. Yes, we can use RADIUS. It’s just something to note. Maybe my familiarity with TACACS is just another sign of my age.

Clearly, and I’m sure this will shock no one, each platform is primarily geared to provide the best experience to their own customers. Do you have Mist Wi-Fi and switching and SD-WAN? Cool. There’s a lot of interesting things you’ll be able to do. And if you have Arista switching and Wi-Fi then AGNI will be a great fit for you. How well will they integrate for customers who have multi-vendor environments? That remains to be seen.

So…why does “Cloud NAC” make me nervous?

Some of it is, I’m sure, the issue with learning a new platform. I know *what* I want my NAC platform to do but 9 times out of 10 the struggle is “How do I get the platform to do the thing I want?” (True story – just today while writing this I figured out that the problem with my policy was that I had included a period in a Device Group name in ISE and while ISE will let you do that it also will break when you try to reference that Device Group..so yay?)

Juniper here has an edge – their goal is simplification. They want it to be easy. You probably don’t need all those nerd knobs anyway and when you do they may be an API call but they’re still there. I’m sure that most AAA customers only use a fraction of the platform’s features and Juniper will make sure they cover the common use cases quite well. And Arista wants it also to be easy. But the question is will they make it easy for people who need to do complex things?

But even setting aside the inertia of having to learn a new thing there’s something about putting such a low-level resource farther away from the user that just doesn’t sit well. When I compare my enterprise WAN to the “The Internet” I know that my enterprise WAN is built around service guarantees, SLAs, and being able to manage and measure performance. Once your packet is out there on “the Internet” there are no such guarantees. Will it usually work? Sure. What can I do if it’s intermittently failing? Not much. If the peering between your ISP and the cloud vendor that your NAC is running on is congested what happens? I can’t measure that so I can’t manage it. And what impact will variable latency (called jitter by some, or packet delay variation by the pedantic such as myself) have on the user experience? I guess we’re going to find out, especially in 802.1X secured networks that don’t have Fast Transition enabled.

Today I can measure one-way latency. I can do packet captures on both my AP and my ISE PSN to look for packet loss. There are all sorts of fun troubleshooting tricks – things I’ve actually had to do at times – that go out the window when your NAC servers are “on the Internet”. To be fair, most of these tricks have been necessary due to misbehaving clients and not actual AAA problems, but when AAA works it’s a “network problem”, even when it’s a client problem. I generally like to have as much control of dependencies of my platforms as possible, because when they fail I’m the one dealing with it.

Just to prove that it’s not all fear, uncertainty, and doubt I will say that I can see a lot of reasons why this could be a good idea. What’s the worst part of a NAC deployment? Sizing. How many endpoints do I have? How many licenses do I need? How many servers? Appliances or VMs? Yeah, I wouldn’t miss not having to deal with all of that. Especially the licensing discussion.

At the end of the day I’m going to take a “wait and see” approach. I’ll look for a few brave reference customers who face similar challenges to mine and see what their experience is like. I’ll play with things at home and test. Because no matter how old I am I know that fighting the future is pointless. Now the question becomes – is this the future? I think we’ll find out shortly.

Arista’s campus networking story is better than you think.

If you haven’t yet had the chance, go check out Arista’s presentation at Mobility Field Day 8. Here’s a link to the playlist. Go ahead. I’ll wait. (Disclaimer: I was very much honored to be a delegate to this event and so you’ll see me in the videos rocking a beard situation that does need addressing.)

I’ll just come out and say it: I don’t think Arista did a great job of telling their story. There were a lot of things in the presentation that didn’t really seem relevant to wireless engineers (can I waterski on a data lake?) I’m going to give you my take on the parts of their story that I like and why I think it’s a great story for campus networking. Warning, this is a long one and depending how familiar you are with Arista and/or data center networking some of it may be things you already know.

Arista’s approach to campus networking is based on VXLAN and EVPN. I know, I know – folks hate being linked to RFCs but I’m going to give a VERY basic and high level overview for folks, especially wireless engineers, who may not have been exposed to these technologies.

VXLAN is a protocol that allows you to take a layer 2 frame, wrap it in a UDP packet, and send it across a layer 3 network, and then unrwap it. It lets you have a VLAN that is able to appear on multiple switches that don’t have links carrying that VLAN at layer 2. No 802.1q tagging. It is the breakout example of what “software defined networking” means.

The reasons this matters is that large L2/STP networks can be fragile. As I noted once at Airheads on a customer panel: There are two types of network engineers. Those whose networks HAVE BEEN taken down by spanning tree, and those whose networks WILL BE taken down by spanning tree. (When I dropped that hot take I had no idea that Keith Parsons was in the audience and listening to me.) VXLAN allows you to do all the things an L2 VLAN-based network does but it runs on top of a L3 network and your loop-free L3 network isn’t at risk of bridging loops (or spanning tree meltdowns).

EVPN uses Mutliprotocol BGP (MP-BGP) to act as the control plane for the network. (All that MP-BGP means is that it’s BGP that’s been enhanced to carry multiple “address families” namely IPv6, MPLS, and Ethernet VPN.) EVPN lets you use BGP to carry data about the VXLANs, MAC addresses, host routes, and anything you would need to transport an encapsulated ethernet frame from its source to its destination. The network that connects all of the switches together is called the “underlay” and the encapsulated traffic being transported is called the “overlay”.

This technology basically gives you a standards-based SDN solution for a campus. If your entire campus network is an underlay and your user traffic is in the overlay then you can do everything you would do with an L2 campus – you can have a VLAN in multiple buildings, etc – without the risks of a giant spanning tree network. VXLAN/EVPN scales better than any SDN technology I have seen and unlike other vendor-specific approaches to campus SDN it is all based on open standards. In theory one can mix and match vendors as needed. Even Cisco is talking about this SDN approach in the campus.

Arista has one of the strongest plays in this model. They have been doing VXLAN/EVPN networking for a very long time. Their hardware and software are built around it. You don’t need to search a feature sheet – everything they sell does it. And the simplicity of their product line makes it very easy to pick your building blocks. They don’t have “campus” switches and “data center” switches. They have switches with POE and then switches without POE. They had broad MACSEC (and now VXLANSEC) support. It’s a full featured product line that doesn’t overwhelm you with niche plays.

And now their APs speak VXLAN as well.

This is a very interesting solution to a common problem. Tunneling traffic is something that often has to happen in a wireless deployment. It is one way to handle guest traffic for example. We often use a tunneling protocol to backhaul guest traffic to where the security policy enforcement happens. If you’re running a Cisco network it’s likely to be CAPWAP with some sort of anchor controller. If you’re an Aruba customer it might be GRE. If you’re a Juniper customer it’s L2TPv3 with a Mist Edge. But these are all either proprietary or uncommon protocols. Arista is doing it with a common open protocol. I think that’s very cool. (Note, it’s just VXLAN – the APs are not running BGP although that would be pretty epic albeit unnecessary.)

There is one little caveat here regarding roaming. BGP scales but it doesn’t always converge as fast as we would like. The issue all depends on which EVPN-speaker the client’s AP is talking to. If you’re hopping from AP to AP and those APs are connected to the same switch you’re fine. It’s when we need to send out updates that a MAC address has moved from one switch to another switch that we can see latency because it happens via BGP updates and they aren’t always as fast as we would like. If a user is on a call, for example, they very likely will experience a “blip” of sorts. Depending on your environment that may be an edge case or it might be common.

By evolving their campus networking solution out of their data center networking origins Arista then can bring their “secret sauce” to the table. Their management and automation platform (CVP in all it’s various flavors) can automate building out these EVPN topologies for you. Their wired streaming telemetry works very well and CVP can ingest that for you and provide you with analysis. You can do all of this with open source tools and the open protocols that Arista supports but you don’t have to.

For example, even after all of this talk about campus SDN you don’t even have to do any of that – if you want to replicate a traditional controller-based architecture (at least as far as the data plane is concerned) you can. You just need a pair of Arista switches to terminate VXLAN tunnels on. Even their least-capable switch can handle 4,000 APs. And none of the switches between the APs and the tunnel termination switches need to be VXLAN aware and they can be from any vendor.

And I’ll be honest – I love their campus switches. The 720 is a solid 1RU POE switch but these days I just straight out prefer the 722. It has better configurations for AP deployments and you get MACSEC for just a tiny bit more. The 750 is a beast – 384 ports of mutli-gig ports with proper 100G uplinks (if needed). Even the 710 is fun and might be proper successor my beloved 3560CX-8XPD-S. (Although I wish it had 10G ports instead of 5G.)

That is the “story” I would love to hear Arista tell. They don’t try to lock in their customers with proprietary protocols and creating incompatibility. They win customers by building better products and letting you make your own choices. You can buy their hardware and never touch their software if you want. You can use parts of it that make sense for you and ignore parts that don’t. Their commitment to open standards is one of the reason I’m a fan.

WLPC 2022

I love being with people. It’s the most incredible thing in the world. That world may change and evolve but the one thing that will never change – we’re all part of one big family.

–Stan Lee

Well it’s been a minute hasn’t it? WLPC 2022 was a few months ago. (I wrote this shortly after WLPC but forgot to hit the “publish” button.) Boy was great to be back with most of the family once again. It was also, I have to admit, a bit stressful. I had more in-person interaction in those 7 days than I had in the last few years. I can’t speak for anyone else, but I was usually glad to

I was really looking forward to the event. Firstly, my last 2020 had been rather stressful. While I don’t exactly regret it teaching a Deep Dive at this amazing event is a HUGE effort and much respect to those who pull it off better than I did. I was glad to just be an attendee this year. Also, this was my first WLPC since becoming CWNE #414 and I was really looking forward to hanging out with the folks from that community. (Maybe flex a little bit…just a little bit.)

WLPC has a bit of everything (if you want to partake of it). There are bootcamps the weekend before – some of the best training you can find anywhere. There’s the actual conference itself where you hear presentations from your peers about current events in our industry. And last and certainly not least there are the social aspects. There are parties to attend and friends to hang out with. All good fun.

My week started off with the Python bootcamp with Jake Snyder. Automation is a big focus at work and I keep hearing how Python is supposed to be super hot and whatnot. I was fortunate to not be coming in completely ignorant about writing code – I actually did graduate with a CS degree once upon a time. Python just didn’t exist back then. (We managed our own memory allocation and we LIKED IT! Wait, no we hated that.)

I’m not going to pretend that in 3 days I came out of it a Python master but because the class is geared towards Wi-Fi engineers I did come out with a good chunk of healthy examples that show how to do things that can help me in my day to day job. Like: Pull a list of Mist APs from a switch using LLDP information in order to properly configure their ports. (I did that by hand earlier this year for a 500+ AP building and that was, you know, not fun.) And then use that info to pull even more details from the Mist API about those APs. I had been slowly working my way through a Python bootcamp on Udemy but that sort of individual thing lacked the focus and interaction that a real in-person class provides.

Moving on to the main conference I was surprised about the amount of “Wi-Fi 7” talks there were. Let’s keep in mind that 802.11be initial draft is going to be over a year late and that 6E hardware is barely shipping. I think the vendors need to slow their roll a bit. I know, there’s a lot of cool nerd stuff in there but let’s call it 802.11be for now. By invoking the “Wi-Fi 7” moniker it makes folks thinks that products are on the way. And I also wouldn’t be shocked if leadership is going “Why buy Wi-Fi 6E if Wi-Fi 7 will be out soon?” (Here’s a hint, it won’t.)

One of my favorite talks was the first one – Peter Mackenzie’s “It is Impossible to Calculate Wi-Fi Capacity” was a great talk. He spoke the truth about something we all know – and it’s something that I’ve bookmarked to send to management the next time they ask. He also said out loud how Wi-Fi design is both art and science. At times it feels like it gets treated as a commodity…which is how folks end up with bad designs.

The other big surprise was the WLAN Pi Pro. It’s amazing how this tool has evolved over time and I have to stay that this most recent iteration is an amazing tool. If you find a way to pick it up I can highly recommend it. It’s a Swiss Army Knife for Wi-Fi and at the moment it’s the only Wi-Fi 6E client I have.

It was another great WLPC. If you’ve found yourself looking for a conference that gives a great bang for the buck I can’t recommend WLPC highly enough. If you missed Phoenix then WLPC EU in Prague will be in October. If you have a chance you should totally check it out.

Creating a pipeline

Current events compel action. Black Lives Matter. Black Trans Lives Matter. Those are words I believe in but are easy to say and I kept asking myself “what can I do to help?” Saying the words is fine, donating money is better, but is it enough? How to help in the right way?

My industry, the “world of Information Technology”, certainly suffers from a lack of diverse voices. I’ve heard a lot of talk about how “there are no candidates in the pipeline”…ok, fine. But why aren’t there? Is it a lack of training and opportunities? Or is it something much deeper – institutionalized racism and discrimination that keeps black people out?

Irrespective of the cause, we can do something about that. Here is what I’ve come up with: I’ve joined Blacks in Technology as a dues-paying member and donated to fund scholarships for people who want to get their CWNA. We’ve got 10 scholarships for this round. (We’ll do another chunk in about 6 months.) It’s for the “Self Paced Training Kit“.

The key thing here is that I’ve aligned myself with BIT as a supporter and I’m listening. You can do the same. Joining and listening is just the beginning. Or, you can do what thousands of others like me are now doing; speaking out, bringing others along, donating, contributing and actively doing something.

If you’ve been to this blog before (or if you know me outside of this blog) then you probably know one of the areas of networking I am passionate about is Wi-Fi. One of the things I like about Wi-Fi as a career is how much education is valued. There is much to learn and a lot about Wi-Fi that we take for granted. Fortunately we have a great resource in the form of the Certified Wireless Network Professional certifications.

The path to being a Certified Wireless Networking Expert (a path I am on myself) starts with the the Certified Wireless Networking Administrator (CWNA) certification. It covers a lot of really great topics that folks often don’t cover when they start out doing Wi-Fi:

  • Radio Frequency (RF) Technologies
  • Antenna Concepts
  • Wireless LAN Hardware and Software
  • Network Design, Installation, and Management
  • Wireless Standards and Organizations
  • 802.11 Network Architecture
  • Wireless LAN Security
  • Troubleshooting
  • How to Perform Site Surveys

It gives you a very strong foundation about how Wi-Fi works and it’s all vendor neutral. Cisco? Aruba? Mist? Arista? Ruckus? Doesn’t matter – it’s information that anyone working in Wi-Fi should have at their fingertips. As a wise man once said, “You have to learn WHY things work on a starship.” (It was Captain Kirk. Kids, ask your parents.)

The self-paced training kit includes a study guide, access to an online self test, and a test voucher. CWNP’s exams are available in an at-home format, so you don’t need to go anywhere to get this certification. And one of the best parts of this certification, and about Wi-Fi in general, is that there is a lot of demand for wireless engineers all over the country. This isn’t a skill that is just needed in a few places – they need Wi-Fi everywhere.

Baron Mordo knows what’s going on.

(One slight note: Links will take you the CWNA-107 exam, which is being refreshed in September with new goodies like Wi-Fi 6. We may wait for that to drop before sending out kits. Just a ‘heads up’.)

I’m not just going to throw money at the problem, as fun as that is. I am pledging to be a resource and mentor for anyone seeking to walk the path of the Wi-Fis. Whether it’s technical questions or anything else, feel free to slide up in those DMs (or probably email) if you want help. The Twitters, LinkedIn, Slack, Discord, whatever works for you.

If you’re wondering “why Wi-Fi?” it’s because of how much Wi-Fi is needed (and how bad a lot of it is). A couple of the major focus areas for Wi-Fi (we usually call them “verticals”) are K-12 education and healthcare. We’re building networks in parking lots for COVID-19 testing, helping teachers and students get connected, and providing support in hospitals so that front-line healthcare gets done. Wi-Fi is more important than ever.

So if this sounds interesting to you then you may be wondering what to do next. The logistical details are still being sorted and when BIT is ready for students they’ll announce it and I’ll be sure to try and hype it. The money is donated, so this is happening. And thank you to the NVIDIA Foundation for that sweet, sweet corporate match.

I cannot thank BIT enough for being such a great partner. I would have zero idea where to start without their help and Peter Beasley has been an absolute pleasure to work with. They’re doing the hard part, I’m just a guy with an idea. As anyone who has done a startup knows, ideas are cheap – execution is everything. And thanks to Keith Townsend who suggested I reach out to BIT in the first place.

This may sound strange to those of you who haven’t encountered it, but Wi-Fi is really a community. We help each other and share in our common burden – which is folks blaming the Wi-Fi when it isn’t the Wi-Fi. (It’s DNS. It’s ALWAYS DNS.) I’ve really enjoyed joining this community, and I hope you will enjoy it too.

Introducing nanoax

I’ve been rather thrilled that my little “here, do this silly thing with the Nano” idea seems to have worked well for a bunch of folks. Thank you to everyone for their feedback and interest as we all excitedly dive in to this new protocol.

I think it goes without saying that the Wlan Pi is an amazing tool for network engineers. I’ve got one and I love it. And I’ve been wondering – could I do something similar? And possibly make the Nano easier for new users to to get right to the fun part, which is the 802.11ax stuff?

My answer is: The nanoax image.

I’ve taken the standard Nano image (release 4.2.3 as of this writing) and done the following:

  • Updated all of the pre-installed packages (duh)
  • Installed the AX200 drivers
  • Updated Docker to something more recent
  • Downloaded the version of the libretest container I built for the Nano (jakichan/speedtest)
  • Installed Wireshark and other capture tools like Francois did, and I also hid the Eye PA coloring rules in the image.
  • Compiled Kismet – it now works with the AX200.

I will note, this isn’t *quite* like the WLAN Pi image. It still installs somewhat like the default Nano image. (A couple of minor steps are different from the “stock” image that you may notice if you look closely.) You still have to accept the EULA, you get to choose your username and password, configure a timezone, etc.

I’m still working on all the documentation, but for now you should be able to download the image here. By the time this goes live the people in the OFDMA deep dive should have been banging on it for a day or two. I’ll be working on the documentation (I guess I need a cool logo), but in the mean time give it a try and let me know if you have any suggestions.

RNDIS/SSH/X11 fun with Windows

In an earlier post I covered my favorite way to access the Nano via SSH over the USB mini port. And I covered what Mac users need to do to remotely display the Wireshark GUI. But not everyone is a Mac user (I CAN’T EVEN) so what is a Windows user to do? I got you fam.

Step 1: Get an X11 Server

There are a few options, and I can’t speak to all of them. There is Xming and it’s been around the longest as far as I know. It has free and pay versions, but the free version hasn’t really been updated in a while. Cygwin/X is part of the Cygwin package, and that may be a viable option, but with WSL these days I don’t really use Cygwin anymore. (Side note, you’ll note that WSL is *not* part of the solution I’m presenting. I thought it would be easily done that way, but turns out…not. WSL is not really Linux, and that became an issue. I’m not saying it can’t be done, but it was more work than I wanted to do. But for SSH/SCP/etc without X11 it works great.)

I ended up choosing VcXsrv. And to be honest, it “just worked”. Download that and install. Be sure to start it before proceeding.

Step 2: Install PuTTY

Ok, this may seem redundant – I’m pretty sure 99% of network engineers with Windows laptops have PuTTY installed, but in the off chance that you’t don’t have it installed…go do that.

Step 3: Configure networking

At this time, you want to use a USB-micro to USB-A cable and plug that in to the USB-mini port on the Nano and to your laptop. You *should* end up seeing a new network interface. It should look something like:

You may also see some messages about preparing “Linux for Tegra” for use. It may also not be Ethernet 2 depending on your system, but the Remote NDIS part is what to look for. In theory you should have IP connectivity, but in at least once case I was seeing some…oddness…with the DHCP server on the Nano, so I highly recommend you configure a static address on this interface. Anything in 192.168.55.0/24 will work, just don’t use .1. (That’s what the Nano uses.) I’m not going to go over how to statically configure a Windows network interface here, though.

Step 4: Configure display forwarding in PuTTY

Configure a PuTTY session for the Nano. You’ll be SSHing to 192.168.55.1:

and enable X11 forwarding. Scroll down on the left and it’s under Connection, SSH, X11.

Now SSH to the Nano and log in.

Step 5: Run Wireshark

At this point proceed to Step 3 of my previous post (Nano packet captures using the Wireshark GUI) and it’s all the same. Install wireshark and when you run it you should get something like:

Enjoy!

Nano packet captures using the Wireshark GUI

A lot of really cool folks like François Vergès and Gjermund Raaen have been using the Nano as an 802.11ax capture tool, as have I. Let me show you what I’ve been doing to make my captures a bit easier. This method is Mac/Linux oriented but I’m confident it should be easy to do with the Windows Subsystem for Linux. I’ll be sorting out those details shortly.

Step 1 – XQuartz

So no matter which Linux GUI you use it can trace its roots back to X11 and believe it or not when MacOS X first came out it had native X11 support. That has fallen by the wayside but it can still be yours thanks to the XQuartz project. So go to the XQuartz site, download XQuartz, and that gives you an X11 server. Yay!

By the way – if Linux is your desktop of choice then you already have an X11 server, but you also probably already knew that.

Step 2 – Connect to the Nano

As I mentioned in my original post, I power the Nano via the DC barrel connector because it allows 10 watt operation, which is a nice chunk of power. But did you know that the mini port still works while the DC jack power is used? It doesn’t work as a host port but it works just great as a device port. If you plug it in to your Mac you should see something like this:

Yep, it works as an RNDIS device, very similar to what you see with the WLAN Pi if you have one of those (and you should). By the way, “Linux for Tegra” is the official name of the OS running on the Nano. If you ever see “L4T” references, that is what it means. In fact, if you look at the output of “ifconfig -a” on the Nano with the USB connected you should see:

l4tbr0: flags=4163  mtu 1500
         inet 192.168.55.1  netmask 255.255.255.0  broadcast 192.168.55.255
         inet6 fe80::888f:b1ff:fe03:995  prefixlen 64  scopeid 0x20
         inet6 fe80::1  prefixlen 128  scopeid 0x20
         ether 8a:8f:b1:03:09:95  txqueuelen 1000  (Ethernet)
         RX packets 530143  bytes 57724608 (57.7 MB)
         RX errors 0  dropped 0  overruns 0  frame 0
         TX packets 1888782  bytes 2613988298 (2.6 GB)
         TX errors 0  dropped 0 overruns 0  carrier 0  collisions 0

On the WLAN Pi it’s USBO:, but here it’s lt4br0. (I keep seeing L4T BRO!, and the developers just laugh at me.) And with it you can connect to your Nano via SSH by to 192.168.55.1.

However, before you SSH in you should make sure your SSH config includes X-Forwarding. So in your config file, located at ~/.ssh/config you should add a couple of lines:

    ForwardX11 yes
    XAuthLocation /usr/X11/bin/xauth  

Step 3: Install Wireshark

Now you want to make sure Wireshark is installed. François has great instructions on his blog – here are the most relevant bits for us at this moment:

// Install Wireshark (development version)
 sudo add-apt-repository ppa:wireshark-dev/stable
 sudo add-apt-repository ppa:dreibh/ppa
 sudo apt update
 sudo apt -y install wireshark
 sudo apt -y install wireshark-qt
 // Install aircrack-ng
 sudo apt -y install aircrack-ng
 // Install tcmpdump
 sudo apt -y intall tcpdump
 // Allow the user to be able to use tcmpdump over an SSH connection (remote connection)
 sudo groupadd pcap
 sudo usermod -a -G pcap $USER
 sudo chgrp pcap /usr/sbin/tcpdump
 sudo chmod 750 /usr/sbin/tcpdump
 sudo setcap cap_net_raw,cap_net_admin=eip /usr/sbin/tcpdump

Step 4: Monitor Interface

I haven’t found a way around this yet, but what you need to do is use airmon to get the interface into monitor mode. So open a terminal on your Mac and ssh in to the nano:

$ sudo airmon-ng start wlan0 140
 

 Found 5 processes that could cause trouble.
 If airodump-ng, aireplay-ng or airtun-ng stops working after
 a short period of time, you may want to run 'airmon-ng check kill'
 

   PID Name
  3810 avahi-daemon
  3890 avahi-daemon
  4002 NetworkManager
  4058 wpa_supplicant
  9230 dhclient
 

 PHY     Interface       Driver          Chipset
 

 phy0    wlan0           iwlwifi         Intel Corporation Device 2723 (rev 1a)
 

                 (mac80211 monitor mode vif enabled for [phy0]wlan0 on [phy0]wlan0mon)
                 (mac80211 station mode vif disabled for [phy0]wlan0)


All that looks scary, but I haven’t had problems yet. Now you’ll see we’ve chosen a channel on the CLI, but don’t worry – we can change it.

Step 5: Start Wireshark

sudo wireshark

Simple as that. If things are working correctly you should see something like:

That copy of Wireshark is running on the Nano, being displayed on your Mac, and sent over USB. Select the wlan0mon interface and it will start capturing. Also of note, if you go to View -> Wireless Toolbar you can now configure the channel number and width which is a bit easier than doing via CLI. This functionality is appearing to work well – I went hopping around on a few channels and verified I was seeing the BSSIDs I expected to see.

Keep in mind – this application is running on the Nano directly. So if you want your coloring rules to work you need to copy them over. (Thanks Joel!)

That’s pretty much it. For those of you using the Nano as an 802.11ax capture and analysis tool I thank you – maybe this will be a bit easier for some folks. I know it’s coming in handy in my lab.

A speedtest server container for Nano

I’ve been messing around with something on the Nano, and I wanted to use the Librespeed Speedtest application. As part of their github they have a Docker branch and the container *is* on Docker Hub but obviously it’s for amd64. So I rebuilt it on the Nano and pushed it back up as “jakichan/speedtest”. Here’s what you need to do if you’d like to run it on your Nano.

Step 1: Update docker

First things first, the default Nano image does come with Docker. It’s just a bit stale. So let’s update that. To do that you’ll need curl:

sudo apt install curl

Then you need to update docker. Now a good friend of mine (who is a serious expert on container security) said this was a BAD IDEA. (He REALLY DOESN’T LIKE IT.)You should never just download and run stuff from the internet, right? It’s horrible. But yeah, do this:

curl -ssl https://get.docker.com | sh

And now your docker is current! There maybe a better way to do this, but several “how to docker on Ubuntu ARM” pages I saw used this method.

There are some other things you may want to do, such as adding your default login to the docker group to avoid having to type sudo all the time. They tell you how to do that at the end of the install script, it looks like

sudo usermod -aG docker <username>

And then you do have to open a new terminal or login again. But for the rest of this I’ll use sudo in case you didn’t want to do that.

Step 2: Grab the container

sudo docker pull jakichan/speedtest

That will install download the container from Docker Hub.

Step 3: Run the container

To make it easy, run the container with this command:

sudo docker run -e MODE=standalone -e TELEMETRY=true -e PASSWORD="password" -p 80:80 -it jakichan/speedtest

Step 4: Test

Now, if all went well, you should see this if you connect to the IP address of the Nano:

And if you click on start a little speedtest should run, like so:

There’s more to the LibreSpeed tool, and I encourage you to visit their wiki to learn more.